Official Luthiers Forum!
http://www-.luthiersforum.com/forum/

inlay, marquetry help needed
http://www-.luthiersforum.com/forum/viewtopic.php?f=10102&t=5756
Page 1 of 2

Author:  Terry Stowell [ Tue Mar 21, 2006 4:15 am ]
Post subject: 

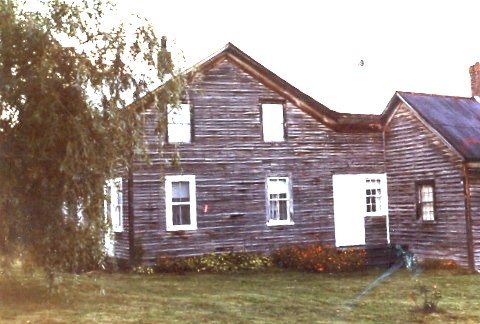
I'm making an "Adirondack guitar" depicting my Grandmother's homestead and some Adirondack things, to be given to my brother for his 50th birthday. He is very deserving of anything I can give him. I owe my life to him.

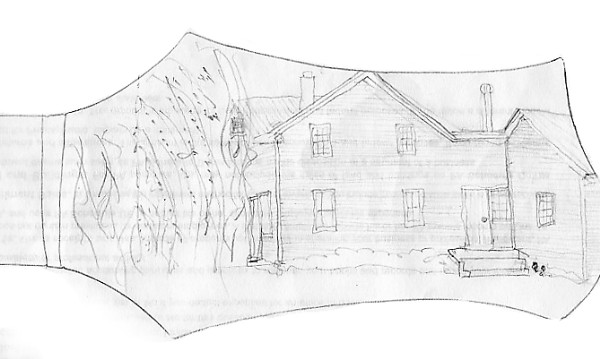
The pictures below should explain. I think materials should be wood for the clapboard siding, black pearl for windows, and I'll replace the willow tree with the spruce tree he planted as a child. (behind the willow, just out of view)

That spruce tree is already made-Holly stained green.

My question is:

1) does anyone have any wood veneers with fine grain lines to mimic the clapboards?

2) materials for a rusty roof, pansies, etc

3) Also, any other ideas are welcome. TIA!!!


Terry Stowell38797.5118287037

Author:  Serge Poirier [ Tue Mar 21, 2006 4:25 am ]
Post subject: 

Hi Terry, you are a fine man, doing this to your brother and it should look awesome!

Idon't have much wood at the moment, purple heart is what i have that would look like the rusty roofing, for what i can see from the picture, if you're interested, give me a PM with your address and i'll send you some!

Serge

Serge Poirier38797.5182523148

Author:  JJ Donohue [ Tue Mar 21, 2006 4:29 am ]
Post subject: 

Terry...I love the theme and the sentiment behind the project. Another great legacy guitar to be treasured by generations to come! Good luck and best wishes.

Being a Pennsylvania native myself, what area of the state are you from? I was born and raised for 17 years in the anthracite coal region (Shamokin) and later moved to the western part of the state (New Castle).

BTW...I don't have a clue to help you with your original question but I'm sure the experts will chime in with some appropriate suggestions.

Author:  Michael Dale Payne [ Tue Mar 21, 2006 4:44 am ]
Post subject: 

etching may be the answer and remember you don’t have to etch every line full length. or inlaying individual strips. Getting the grain lines work well as you change perspective plane may be very difficult trying to use the grain to replicate the cabarets.

If you pay close attention to the cabaret lines in the photo you will notice that on the sides of the house the lines run at an angle toward a disappearing or vanishing point. (a perspective term) and the facing side of the house the lines run closer to parallel to the viewing plane. But in truth they too are merging toward a vanishing point as well. If you do not account for this perspective the view will come out with a flat, premitive apperance. I think etching will be easer to to pull the effect off.
MichaelP38797.5326273148

Author:  Terry Stowell [ Tue Mar 21, 2006 5:13 am ]
Post subject: 

Good points about the perspective.

Explain the etching. I'd considered woodburning them in. Great moteling. The house has lots of weathered character. That MUST come across, as well as the gray and rusty brownish weathered wood.

Author:  Terry Stowell [ Tue Mar 21, 2006 5:20 am ]
Post subject: 

JJ:
Thanks. I was born and raised in the Adironacks. We may retire on land up there. Since 1990, I've been in Harrisburg area.

My great, great grandfather was a famous mountain guide, and I might get his mug in there too. Probably engraved pearl. My buddy builds banjos, maybe he can do it.


Author:  Don Williams [ Tue Mar 21, 2006 5:41 am ]
Post subject: 

Speaking of the perspective, the window on the addition to the right is drawn in incorrectly...

What a great idea Terry...and a great looking old homestead. I would also love to retire up to the Adirondacks. It's a great place. Maybe someday we'll be neighbors!Don Williams38797.5711805556

Author:  Michael Dale Payne [ Tue Mar 21, 2006 5:57 am ]
Post subject: 

Just as you would with shell you can engrave lines into a hard wood. I don’t think you can braze them small enough to pull off the affect you are looking for. I used etch but engrave is a better term. A jewelers engraving set will do the job. Keep the engraving simple but affective. You want the lines to be clear and distinct at near edges and corner of perspective changes, but thinned out and disappear as they move closer to the vanishing points, but not all at the sane time. This gives a field of focus effect and keeps the image from being too busy. Google some images using “2 or 3 point perspective + sketch” to get some examples of what I am describing. If you use wood I would use something that has little or no figure and will oxidize to a grayish brown like popular. The problem here is that if you sand the wood the natural patina will be sanded off. So chose the media carefully. Maybe even consider something like black MOP or another shell with a brown gray hue. I really think engraving will work better than trying to use grain lines to form the perspective.

Here is an example of how to layout a 2 point perspective. You can increase or decrease the angle of approach to define the focal or viewing point. Now take a piece of tracing paper and lay over your photo and extend the edges of the eves and foundation from each side of the house till the lines that forms the eve and foundation meet at two points and you will have the vanishing points for that photo. Every vertical and horiz. line are based on these lines. This will make it easer to draw everything in good perspective with each other
MichaelP38797.5850810185

Author:  Terry Stowell [ Tue Mar 21, 2006 6:09 am ]
Post subject: 

Good thoughts. I'd need a huge chunk o' black pearl to do that large a job, but it could be scaled down. There are other neat elements that could be added, a barn in the bckgrnd, a 4 pole laundry line, etc.

My thought was to get some wood (holly?) and dye it grayish, all the way through. Engraving seems the right choice. It certainly could capture the weathered look.

I think the only way to do this is gather a bunch of materials and experiment with them.

Thanks Michael, for going out of way with the graphic. I hope many people who will one day search the archive get a lot from your help. I appreciate you!

Don, we own 30 acres of wilderness right off the highway. We will definitely subdidvide, and consider selling when we cross that bridge. SOmeone's gotta help bringing in the utilities and road! $$$ Terry Stowell38797.5922800926

Author:  Michael Dale Payne [ Tue Mar 21, 2006 7:02 am ]
Post subject: 

You can keep the scale up by using a differnt piece of shell for each face of the building. this also helps to create a changing depth of field to shell work

here is an example of what I ment about not engraving the lines full lenght of the face to give depth of field notice how the ines are itermitten but on plane and more pronounced at near edges and fade and lighten as they move to far edges
MichaelP38797.6275231481

Author:  Alan Carruth [ Tue Mar 21, 2006 7:44 am ]
Post subject: 

How about some spruce for the clapboards, stained grey? You could use the old fashioned ferric acetate (steel wool in vinegar) followed by tannic acid (logwood tea). Get logwood from Kremer's. You might have to experiment for a bit to get the color right, but you should be able to find a piece of spruce or other prominantly grained softwood with the right spacing. You might even find one with converging grain lines, say, near a knot.

Most of the red woods I know of are too bright for a rusty roof, but could possibly be 'saddened' by the same process.

Sounds like a fun project!

Author:  Kevin Gallagher [ Tue Mar 21, 2006 8:20 am ]
Post subject: 

   I agree with Al's suggestion for materials and have done similar treatments to bring an older, warmer look to spruces and colored woods. I especially likethe idea of using the prominant grain lines to portray the clap board separations. Anytime you can use an organic line or figure to create detail or depth, do so. It only contributes to the overall charm and interest of the piece being inlaid.

Terry, you're putting your inlay in my Omega headstock shape....or one almost identical to the one I've been using for nearly twenty years. I was surprized one day about seventeen years or so ago to have someone bring an early Olson to me for a little work. I'd never seen an Olson or even heard of Jim at the time and found it funny that we had chosen head shapes that were close to a mirror image of one another.

The inlay looks nice and should prove to be a touching tribute to a very special family history. Have fun with it.

All the best,
Kevin Gallagher/Omega Guitars Kevin Gallagher38797.8004050926

Author:  Pwoolson [ Tue Mar 21, 2006 9:50 am ]
Post subject: 

Terry, I'm just now getting to this thread. MP is spot on with the perspective thing. I actually took a class in art school called "Freehand perspective". If you trace the photo, you'll already have perspective because that's how the eye/camera sees things. If you draw it out, do as MP says. One thing to remember is that all vertical lines remain vertical. Otherwise the building will be leaning.
Great idea on the guitar, I look forward to seeing the process.

Author:  Terry Stowell [ Tue Mar 21, 2006 11:14 am ]
Post subject: 

Thanks Paul. I'm on it too. I fully understand the challenge of finding any wood with a heavy vanishing point, esp for the very far left side of the house. I need to gather up some materials and start experimenting. Maybe I'll just use a full frontal of the house, using the spruce tree to break up the "one dimensional" feel. I just don't have a photo to work from

AL: What is logwood and what or who is Kremer's?

I've already got the steel wool in (white) vinegar. I've known about that trick for a few years, never tried it though. I guess I'll try some tea bags

KEVIN:
Having trouble finding internet pix of your instruments. I didn't know that was what you were using. When I drew that a couple years ago, I freehanded it, based on what I'd seen on Olson's. I brought it up as a topic a few months ago, and decided against using it. I wound up freehanding one that apparently looks like Bourgois. Sigh. I search on...Terry Stowell38797.8165046296

Author:  Kevin Gallagher [ Tue Mar 21, 2006 12:19 pm ]
Post subject: 

Terry,
   Here's a photo of the rear of a headstock that i just sent to someone today who was asking about a Koa veneer on the back of their head.

   You'll notice that from behind it resembles the Olson head from the front. Purely coincidence. Stranger things happen every day.

Not to worry my friend,
Kevin Gallagher/Omega Guitars


Author:  Terry Stowell [ Tue Mar 21, 2006 12:24 pm ]
Post subject: 

Kevin,

is there a place on the net where I can find some of your stuff? Guitargal didn't have any last I'd checked....

Author:  Anthony Z [ Tue Mar 21, 2006 1:43 pm ]
Post subject: 

Terry,

Great project and your sketch is almost there!

SIDING
I really like Al Carruth's idea of using spruce (stained) for the sides.

WINDOW FRAMES
For the window frames you could use holy or whitish corian (shell is too brittle for such fine pieces).

WINDOWS
Check out the recent articles in GuitarMaker -- there was a 2 or 3 part series -- (author's name escapes me -- was it Nichols?) He used thin MOP for glass over a picture....cool effect.

ROOF
As for the roof -- check out Rescue Pearl they sell a lot of different colours/patterns of Recon stone that might work for the roof.

FOLIAGE
Green Recon stone. Burl works nicely for tree trunks.

GRAVING
A departure from Michael Payne's idea about graving -- I'd use a carbide tip pen (jeweler suppliers sell them) to scribe along a straight edge. The pen I speak of looks like a mechanical pencil -- with a carbide tip. It'll be easier to get a fine accurate line that using a knife graver. If you don't want to go to the trouble of getting the pen, use an exacto blade. Level the spruce after its been inlayed, stain as Al suggests, then a wash coat of shellac, then scribe and go over the scribed lines with a .005" tip Staedler drafting pen. (If you don't shellac the ink will badly bleed into the spruce).

I'd go with a 3-D drawing as opposed to your idea of a full frontal -- it'll look a lot better and give greater depth to your work.

Looks like you've got a good 50+ hours of work ahead of you...should look great when its done.

Author:  old man [ Tue Mar 21, 2006 2:54 pm ]
Post subject: 

Terry, how about using that clothes line with the four posts for fret markers?

Ron

Author:  Terry Stowell [ Tue Mar 21, 2006 3:39 pm ]
Post subject: 

Ron, neat idea, but it's not as significant as some other personal things to our upbringing. If it were mine, I might put a caterpillar, cocoon, and monarch butterfly somewhere. Stuff I played with as a boy. You know, bugs N' stuff.

However, I think I will try to get another pix and put the clothesline on the right, cropping out most of that willow on the left. In other words "PAN RIGHT" a few feet.

This is an exciting project. Can't wait to get over the hurdle.

Author:  tippie53 [ Tue Mar 21, 2006 3:41 pm ]
Post subject: 

Terry
   I have lots of stuff you can rumage throug. i think corian may be of help plus I have other woods
john hall

Author:  Terry Stowell [ Tue Mar 21, 2006 3:51 pm ]
Post subject: 

Thanks John, Next time I'm up I'll do that. I'm sure the more stuff I see, the more creative I'll get. I appreciate the offer.

See you sooner or later!

Author:  Cocephus [ Tue Mar 21, 2006 6:54 pm ]
Post subject: 

Something else that may be of some help is to edit the photo and do some playing around with it to get some kind of plan as to where you want your lines to go. I`m using MGI Photsuite 8.1, and there`s alot you can do with it. Good luck.
Coe

Author:  old man [ Wed Mar 22, 2006 2:06 am ]
Post subject: 

Hey, Terry

micromark.com    has a bottle of stuff called "Age-it easy" or "Easy age-it", not sure which, but it ages wood instantly. They have lots of neat things for people working with small items. They even have lights for your dremel. I want to get that, but don't know if it will work with the router base, as it also screws onto the end of the dremel.

Ron

Author:  Michael Dale Payne [ Wed Mar 22, 2006 2:53 am ]
Post subject: 

[QUOTE=Terry Stowell] I just don't have a photo to work from
...[/QUOTE]

The one you posted on you first post will work

Author:  Alan Carruth [ Wed Mar 22, 2006 9:12 am ]
Post subject: 

'Kremer's' is:
Kremer Pigments
228 Elizabeth St.
NY, NY 10012
kremerpigments.com

It's the US branch of a big art supply house.

Logwood, iirc, is a natural source of tannin, and turns many organics dark brown all by itself. The ferric acetate leaves behind iron, which is converted by the tannin into a black oxide within the wood. This is a very old and very black dye. Kremer also sells logwood extract for about $10/100 grams, which should last you a while. I think for what you want I'd thin things out a good bit, so that you end up with grey. As I say, it will probably take some experimenting to get it right, but should give the most 'natural' look. Once you get the concentrations adjusted, stain a fairly large piece of wood and cut out the part that looks most like your house in terms of intensities and gradiants. In other words, treat it like pearl.               

Page 1 of 2 All times are UTC - 5 hours
Powered by phpBB® Forum Software © phpBB Group
http://www.phpbb.com/